Adsense HTML/JavaScript
Wednesday, July 22, 2020
XTW LINK ST V2/ST LINK V2
It's a XTW LINK ST V2/ST LINK V2 (3.3V/5V) for STM8 / STM32.
Description:
- Use aluminum alloy U disk shell to install internal motherboard.
- The interface definition is directly marked on the enclosure.
- 5V, 3.3V at the same time to provide external use, convenient for you to connect 5V and 3.3V target board.
- The shell characters use laser engraving, never fade off and permanent clarity.
- The internal motherboard with 500MA self recovery fuse, completely protect your expensive computer motherboards.
- Red and blue double color LED indicator lamp, it is convenient for you to observe the working state of ST-LINK V2 at all times.
- Distribution dupont wire, so that you can easily deal with the wire sequence of different target board.
- The outer packing is made of anti-static bag and sealed pack by automatic sealing machine. It is safe and reliable and not afraid of static electricity or water.
Wednesday, July 8, 2020
LILYGO TTGO T-Wristband (DIY Programmable Smart Bracelet)
With ESP32-PICO-D4 Main Chip, 0.96 Inch IPS Screen, 9-axis IMU (Inertial Measurement Unit) sensor, battery and Flash Tool Board (to download your own program), LILYGO TTGO T-Wristband is a easy DIY Programmable Smart Bracelet.
T-Wristband has a built-in PCF8563 clock chip and a matching 13PIN FPC cable. It can DIY to expand other functions by itself. At the same time, it also has built-in WiFi / Bluetooth ceramic antenna that can enhance the signal and 55mA rechargeable lithium battery. It is also equipped with LSM9DS1 sensor (LSM9DS1 is an alternative sensor for MPU9250), Can perform posture detection! 0.96-inch IPS colorful screen, TTP223 touch key chip. Excellent color display and adjustable backlight display.
Product page at Lilygo:
http://www.lilygo.cn/claprod_view.aspx?TypeId=62&Id=1282&FId=t28:62:28
More Information:
https://github.com/Xinyuan-LilyGO/T-Wristband
T-Wristband has a built-in PCF8563 clock chip and a matching 13PIN FPC cable. It can DIY to expand other functions by itself. At the same time, it also has built-in WiFi / Bluetooth ceramic antenna that can enhance the signal and 55mA rechargeable lithium battery. It is also equipped with LSM9DS1 sensor (LSM9DS1 is an alternative sensor for MPU9250), Can perform posture detection! 0.96-inch IPS colorful screen, TTP223 touch key chip. Excellent color display and adjustable backlight display.
Product page at Lilygo:
http://www.lilygo.cn/claprod_view.aspx?TypeId=62&Id=1282&FId=t28:62:28
More Information:
https://github.com/Xinyuan-LilyGO/T-Wristband
Sunday, July 5, 2020
Sipeed MAIX BiT with Mic (RISC-V K210)
Sipeed MAIX BiT with Mic
with 64bit Dual Core RISC-V CPU, Kendryte K210.
Micropython on K210 - MaixPy:
MaixPy is ported Micropython to K210. Currently the only official document website: maixpy.sipeed.com. Development board information: dl.sipeed.com, wiki.sipeed.com.
with 64bit Dual Core RISC-V CPU, Kendryte K210.
Micropython on K210 - MaixPy:
MaixPy is ported Micropython to K210. Currently the only official document website: maixpy.sipeed.com. Development board information: dl.sipeed.com, wiki.sipeed.com.
updated@2023-04-26:
Some links changed, check Update MaixPy firmware and install MaixPy IDE on Windows 11.
Upgrade MaixPy firmware on Sipeed MAIX BiT, on Windows 10
This video show how to download and flash MaixPy firmware on Sipeed MAIX BiT, on Windows 10. Basically follow the steps in MaixPy Documentation (English), or https://maixpy.sipeed.com/zh/ (Chinese).
Visit https://github.com/sipeed/kflash_gui/releases to download the upgrade tool, kflash_gui
Visit https://github.com/sipeed/MaixPy/releases to download MaixPy firmware
Unzip and run the upgrade tool kflash_gui
- Open the downloaded MaixPy firmware
- Confirm board settings
- Connect Sipeed MAIX BiT to USB port, serial port setting will show the port automatically.
- Download
Once finished, you can connect to MaixPy/Sipeed MAIX BiT using Putty.
You can find the connected USB port using Run Device Manager, COM12 and COM13 in my setup.
Run Putty
- Select Connection type using Serial, Serial line, Speed of 115200, then Open.
Optionally you can install MaixPy IDE
Using the MaixPy IDE will facilitate real-time editing of the script on the computer, as well as being able to view the camera images in real time, and save files to the development board.
~ MaixPy IDE
K210 on PlatformIO:
PlatformIO now support Kendryte K210 officially. For this board, it should be Sipeed MAIX BiT with Mic.
Upgrade MaixPy firmware on Sipeed MAIX BiT, on Windows 10
This video show how to download and flash MaixPy firmware on Sipeed MAIX BiT, on Windows 10. Basically follow the steps in MaixPy Documentation (English), or https://maixpy.sipeed.com/zh/ (Chinese).
Visit https://github.com/sipeed/kflash_gui/releases to download the upgrade tool, kflash_gui
Visit https://github.com/sipeed/MaixPy/releases to download MaixPy firmware
Unzip and run the upgrade tool kflash_gui
- Open the downloaded MaixPy firmware
- Confirm board settings
- Connect Sipeed MAIX BiT to USB port, serial port setting will show the port automatically.
- Download
Once finished, you can connect to MaixPy/Sipeed MAIX BiT using Putty.
You can find the connected USB port using Run Device Manager, COM12 and COM13 in my setup.
Run Putty
- Select Connection type using Serial, Serial line, Speed of 115200, then Open.
Optionally you can install MaixPy IDE
Using the MaixPy IDE will facilitate real-time editing of the script on the computer, as well as being able to view the camera images in real time, and save files to the development board.
~ MaixPy IDE
K210 on PlatformIO:
PlatformIO now support Kendryte K210 officially. For this board, it should be Sipeed MAIX BiT with Mic.
Sunday, June 28, 2020
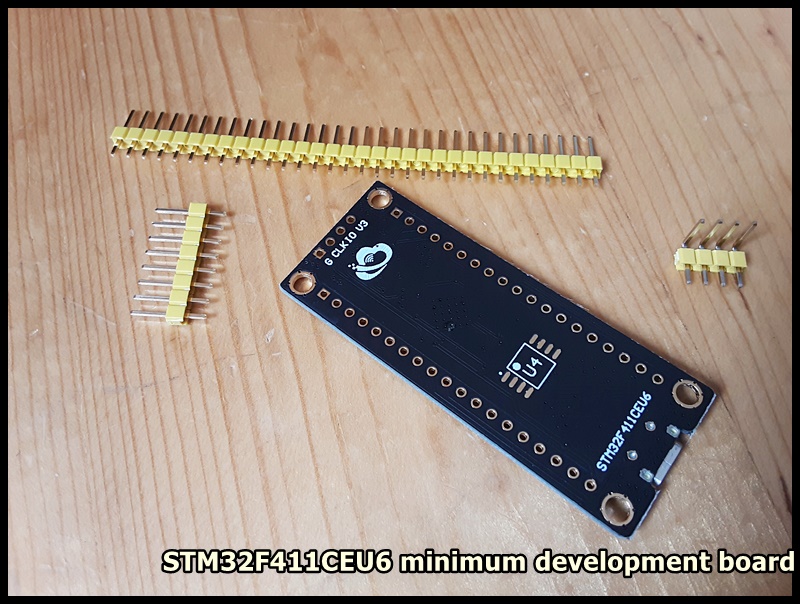
STM32F411CEU6 minimum development board, and install stm32duino/Arduino_Core_STM32 on Arduino IDE/Windows 10.
Just received a STM32F411CEU6 minimum development board:
claimed:
STM32F411 Development Board
- Frequency up to 100 MHz
- Up to 512 Kbytes of Flash memory
- 128 Kbytes of SRAM
Information available at https://pan.baidu.com/s/1MDfunchq5IWM3hQ6MRw18A with access code: xbc9
But I'm outside China Mainland, so I cannot access Baidu cloud storage!
Test with stm32duino/Arduino_Core_STM32 on Arduino IDE/Windows 10
This board used DFU to upload program, so have to install STM32CubeProgrammer first.
Visit https://www.st.com/en/development-tools/stm32cubeprog.html, follow the steps to install STM32CubeProgrammer.
Then add the path of bin directory of installed STM32CubeProgrammer to your system PATH.
Install stm32duino/Arduino_Core_STM32, this repo adds the support of STM32 MCU in Arduino IDE.
To install Arduino_Core_STM32, open Arduino IDE.
Click Menu > File > Preferences, add the following URL to Additional Boards Manager URLs:
https://github.com/stm32duino/BoardManagerFiles/raw/master/STM32/package_stm_index.json
> Tools > Board: STM32 Boards (slected from submenu) > Generic STM32F4 series
> Tools > select submenu of Board part number > BlackPill F411CE
> Tools > Upload method > STM32CubeProgrammer (DFU)
Load the example Blink
Now press the buttons on the board to enter DFU mode.
> Press and hold the button BOOT0
> Preess and release the button RST
> Release the button BOOT0
The LED D3 will OFF.
Now you can verify and upload the program to the board.
Done. Now the LED D3 will start to blink.
remark:
Before trying BlackPill F411CE, I tried board part number of Generic F411CE. Success to verify and upload, but the LED not turn on.
Next:
claimed:
STM32F411 Development Board
- Frequency up to 100 MHz
- Up to 512 Kbytes of Flash memory
- 128 Kbytes of SRAM
Information available at https://pan.baidu.com/s/1MDfunchq5IWM3hQ6MRw18A with access code: xbc9
But I'm outside China Mainland, so I cannot access Baidu cloud storage!
Test with stm32duino/Arduino_Core_STM32 on Arduino IDE/Windows 10
This board used DFU to upload program, so have to install STM32CubeProgrammer first.
Visit https://www.st.com/en/development-tools/stm32cubeprog.html, follow the steps to install STM32CubeProgrammer.
Then add the path of bin directory of installed STM32CubeProgrammer to your system PATH.
Install stm32duino/Arduino_Core_STM32, this repo adds the support of STM32 MCU in Arduino IDE.
To install Arduino_Core_STM32, open Arduino IDE.
Click Menu > File > Preferences, add the following URL to Additional Boards Manager URLs:
https://github.com/stm32duino/BoardManagerFiles/raw/master/STM32/package_stm_index.json
> Tools > Board: STM32 Boards (slected from submenu) > Generic STM32F4 series
> Tools > select submenu of Board part number > BlackPill F411CE
> Tools > Upload method > STM32CubeProgrammer (DFU)
Load the example Blink
Now press the buttons on the board to enter DFU mode.
> Press and hold the button BOOT0
> Preess and release the button RST
> Release the button BOOT0
The LED D3 will OFF.
Now you can verify and upload the program to the board.
Done. Now the LED D3 will start to blink.
remark:
Before trying BlackPill F411CE, I tried board part number of Generic F411CE. Success to verify and upload, but the LED not turn on.
Next:
Related:
Tuesday, June 23, 2020
Install Python 2 and pip on Ubuntu 20.04
In 20.04 LTS, the python included in the base system is Python 3.8. Python 2.7 has been moved to universe and is not included by default in any new installs. (ref: Ubuntu 20.04 LTS (Focal Fossa) release notes)
To install Python 2 on Ubuntu 20.04, it's easy as run the command:
$ sudo apt install python
But you cannot install pip using old approach! If you run the "sudo apt install python-pip", you will be report with "E: Unable to locate package python-pip".
To install pip for Python 2 on Ubuntu 20.04:
Visit https://bootstrap.pypa.io/ and download get-pip.py
Install with python:
$ sudo python get-pip.py
To install Python 2 on Ubuntu 20.04, it's easy as run the command:
$ sudo apt install python
But you cannot install pip using old approach! If you run the "sudo apt install python-pip", you will be report with "E: Unable to locate package python-pip".
To install pip for Python 2 on Ubuntu 20.04:
Visit https://bootstrap.pypa.io/ and download get-pip.py
Install with python:
$ sudo python get-pip.py
Thursday, January 9, 2020
Software Development for MCUs High performance on ARM Cortex M, with Qt for MCUs
Qt for MCUs not only lets you use your favorite Qt tools to design, develop and deploy your MCU’s software, but with our completely new and lightweight implementation of Qt Quick for microcontrollers you can now also create complex user interfaces that are also scalable.
This video cover:
- Introduction to Qt for MCUs
- How Qt for MCUs can benefit your project
- Memory footprint and performance indicators on NXP RT, STM32 and Renesas
- Demonstrations
Qt for MCUs 1.0 is now available:
~ https://www.qt.io/blog/qt-for-mcus-1.0
This video cover:
- Introduction to Qt for MCUs
- How Qt for MCUs can benefit your project
- Memory footprint and performance indicators on NXP RT, STM32 and Renesas
- Demonstrations
Qt for MCUs 1.0 is now available:
~ https://www.qt.io/blog/qt-for-mcus-1.0
Subscribe to:
Posts (Atom)